
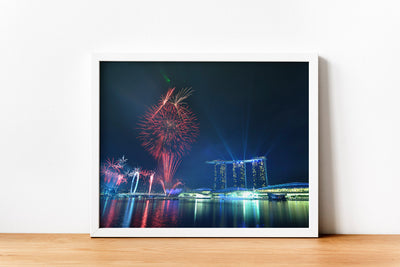
Photo by Migrant Worker Theresa Del Mundo
Smartphone photography has come a long way, and with the right techniques and tools, you can capture stunning images that rival those taken with professional cameras. By implementing these ten tips, you can improve your mobile photography skills and make the most of your smartphone's camera capabilities. Remember to experiment, practice, and have fun while capturing the world around you through your smartphone lens.
1. Clean your smartphone camera lens
The first step in capturing stunning images is to make sure that your smartphone camera lens is clean. Over time, your phone's camera lens can accumulate dust, dirt, and fingerprints, which can affect the quality of your photos. To clean your lens, gently wipe it with a microfiber cloth or a lens-cleaning tissue. Avoid using regular tissue paper or your shirt, as this may cause scratches on the lens.2. Set the Resolution to the Highest Possible Setting
The first thing you should do is set the camera resolution to the highest possible setting. This will ensure that your photos are as detailed as possible and can be enlarged or printed without losing quality. Most smartphones have a high-resolution setting, so go to your camera settings and choose the highest option available.
3. Use Rear Camera for Best Quality Pictures.
Rear cameras often have a higher megapixel count, better sensors, and more features than front-facing cameras. Use the rear camera for important shots or when you want to capture more detail.
4. Turn On Gridlines
Most smartphones have an option to turn on gridlines in the camera settings. Gridlines help you follow the rule of thirds, which is a basic principle of photography. This principle states that if you divide an image into thirds, both horizontally and vertically, you will get nine equal parts. By placing your subject along these lines, you can create a more balanced and aesthetically pleasing photo.
- For iPhone users: Go to Settings > Camera > Grid, and toggle the switch to the 'On' position.
- For Android users: Open the Camera app, go to Settings > Gridlines (or similar option), and select the 3x3 grid option.
5. Forget about digital zoom
Digital zoom can result in a loss of quality because it enlarges the image digitally rather than optically. Moving closer to your subject or cropping the photo after capturing it will maintain the quality of the image. Avoid using digital zoom as much as possible unless you are in a shoot or miss situation.
6. Tap to focus and adjust exposure
When taking a photo, it's essential to have your subject in focus. To achieve this, tap on the screen where you want the camera to focus.
Your next goal as a photographer is to create a perfectly exposed photo: A photo with details in the darkest shadows and the brightest whites. Perfectly exposed photos nearly always look better than their underexposed and overexposed counterparts. First of all, your smartphone has something called autoexposure. Basically, it evaluates the scene in front of you and selects the exposure it thinks best. It does a pretty good job, most of the time. If you need to fine-tune the exposure, you can do so by dragging the exposure slider (usually a sun icon) up or down on your screen.
On some smartphones, you may need to tap the screen once more to reveal the exposure slider.
- For iPhone users: Tap and hold the sun icon next to the focus square (after you tap on the screen), then slide your finger up or down to increase or decrease the exposure.
- For Android users: The process may vary depending on the device, but usually, you can tap on the screen to reveal the exposure slider (often represented by a +/- icon), then slide your finger up or down to adjust the exposure.
7. Capture multiple shots and choose the best one
When photographing moving subjects or spontaneous moments, it's essential to capture multiple shots. Most smartphones have a burst mode that allows you to take several photos in rapid succession by pressing and holding the shutter or volume button. This feature increases the likelihood of capturing the perfect moment. Afterward, you can review the images and choose the best one to keep.
8. Utilize HDR mode
High Dynamic Range (HDR) mode is a useful feature in smartphones that can help you capture more details in both bright and dark areas of a scene. HDR mode takes multiple exposures of the same scene and combines them into one image, resulting in a balanced exposure and increased detail. To use HDR mode on your smartphone:
- For iPhone users: Open the Camera app, tap on the HDR icon, and select 'On' or 'Auto'.
- For Android users: Open the Camera app, go to Settings or Camera Modes, and enable HDR or HDR+ mode.
Keep in mind that HDR mode may not be suitable for every situation, especially when photographing fast-moving subjects, as it can result in ghosting or motion blur.
9. Turn On Night Mode for Low Light Scenes and Use Portrait Mode for a Blurred Background
Night mode can help you capture better photos in low light conditions. When you turn on night mode, your camera takes multiple photos with different exposures and combines them to create a brighter and clearer photo.
- For iPhone: Open the Camera app > Tap Night Mode icon > Choose either On or Off.
- For Android: Open the Camera app > Tap the Night Mode icon > Choose either On or Off.
Portrait mode creates a blurred background effect, also known as bokeh. This is great for portraits or when you want to highlight your subject and blur out the background. Make sure your subject is within the recommended distance from the camera for best results.
- For iPhone: Open the Camera app > Swipe left until you find Portrait mode > Position your subject within the frame and take the photo.
- For Android: Open the Camera app > Tap on the Portrait icon > Position your subject within the frame and take the photo.
10. Edit Your Photos
Editing your photos can enhance their quality and make them look even better. Most smartphones have built-in editing tools that let you adjust brightness, contrast, color, and more. You can also use third-party editing apps for more advanced editing options.
With these 10 tips and camera settings, you can take stunning photos like a pro with just your smartphone. Remember, the key to great smartphone photography is practice and experimentation. So, don't be afraid to try new things and explore the full potential of your smartphone camera. With a little bit of creativity and a lot of fun, you can take stunning photos that you'll be proud to share with your friends and family. Happy snapping!
 Rule of Third application
Holdinghands Studio


Leave a comment